Wednesday, September 29, 2010

Pineapple Almond Muffins


What I used:

1 1/4 cups all-purpose flour
1 egg
1/4 cup melted butter
1/2 cup granulated white sugar
1/2 cup crushed pineapple juice
1/2 teaspoon almond extract
2 1/2 teaspoons baking powder
1/4 teaspoon baking soda
1/2 teaspoon salt
1/2 cup sliced almonds

How I did:
  • Preheat oven to 350 deg F (175 deg C). Grease muffin pan with butter or line up with muffin liners.
  • In a bowl, beat eggs along with butter and sugar until smooth. Stir in pineapple juice and almond extract.
  • In separate bowl put all purpose flour, baking powder, baking soda, salt, and half of the sliced almonds.  Stir well and pour into pineapple mixture. Stir to moisten. 
  • Pour into prepared muffin pan upto 2/3 level full and sprinkle rest of the almonds over the top.
  • Bake in the oven for 20 to 25 minutes or until a toothpick inserted comes out clean. 
  • Let stand 10 minutes. Remove from pan.
  • Serve warm.  Can also be stored in an air tight container upto a week in the refrigerator.


Saturday, September 25, 2010

Sour Cream Red Bell Pepper Dip


What I used:

Red Bell Pepper : 1
Fat free sour cream : 1 cup
Ground pepper : 1/2 tsp or as required
Garlic cloves : 3 to 4
Salt : as required
Oil : 1 tbsp

How I did:
  • On a low gas flame, roast the bell pepper.   Turn frequently with the help of tongs until it is roasted completely (almost turned black) on all the sides.  Put it in a vessel and cover it with lid for 5 minutes.  This will do the rest of the steaming process.
  • You can even roast the bell pepper in an oven.  Preheat the oven to 400 deg F.  Brush the bell pepper with some oil and place it in an oven safe container.  Bake it for more than half-hour turning every 10 minutes.
  • When cooled, cut it into half, remove the seeds, and chop into small chunks.
  • Process bell pepper chunks and garlic cloves in a food processor until smooth. Add sour cream along with salt and ground pepper and process until mixed.
  • Store in the refrigerator until served.
  • This dip is great on fresh veggies, pita chips, crackers or potato chips.

Friday, September 24, 2010

Nethi Mysore Pak


What I used:

Besan : 1 cup
Sugar : 1 3/4 cup
Ghee : 1 3/4 cup
Water : 1 cup

How I did:
  • Sieve the besan to remove lumps and roast it in a nonstick pan until you smell the aroma of besan being roasted.
  • Take a thick and a little bottomed vessel or kadai, add sugar and water into it.  Bring to boil until sugar dissolves and continue boiling till it reaches a thread like consistency.  To test it, take a little of the syrup with a spoon, pinch a drop of syrup with your index finger and thumb (be careful it will be too hot) and open up the fingers (not very wide, just a centimeter).  If the syrup forms a thread like shape between your fingers the sugar syrup is ready.
  • Meanwhile, melt ghee completely in a vessel on another stove, switch off and let stay on the stove.
  • When the syrup is ready, add 2 tbsps of besan in a sprinkling manner while mixing with a spatula.  When the besan is completely dissolved and starts foaming, add 4 tbsps of ghee.  Mix thoroughly until the ghee is combined.
  • Keep on stirring and repeat the above step until you finish off all the besan and ghee. 
  • Cook stirring till the mixture separates the vessel.
  • Pour in a greased plate and let settle for 5 to 10 minutes.
  • Cut into desired shapes at this stage and let cool completely before breaking into your cut shapes.
  • Serve or store in an air tight container.

Thursday, September 23, 2010

Neyyi (Ghee / Clarified Butter)

You all might be aware that GHEE is used in almost every Indian cuisine.  It is also often used in various religious ceremonies.  Because of its medicinal and healing properties Ghee is also used in several ayurvedic medicines.  Ghee is the richest source of milk fat of all Indian dairy products. It is the Indian counterpart of western butter. Coming to the nutritional value, it is rich in fat-soluble vitamins, especially, vitamin A and D.

The traditional way of preparing butter (the raw material for ghee) is to churn the curd / yogurt made by whole milk in an earthen pot with a wooden churn and collect all the froth formed  on the top.  After a sufficient amount of butter is accumulated this butter is melted and boiled on heat for several minutes until all the moisture is evaporated and the milk solids get separated and settled down at the bottom.  After cooling for a while, it is filtered to get the resultant ghee.  Today's commercial ghee manufacturers use cream separators to separate cream directly from the milk instead of curdling it.   


Ghee prepared in the northern parts of the India will be  very light yellow colored and usually has higher moisture content due to under heat treatment while that produced in the southern parts is almost closer to golden color and is slightly over heated. The over heating and under heating depends upon the individual taste and preferences. Both have different flavors. 


 We, in our family, all like the light golden colored ghee with a grainy texture and in this method which I use, the milk solids turn almost black or dark coffee brown color.  We call it godavari.  Even that can be eaten by adding little sugar to it.  It's one of my favorite.  In my post I'm showing you both the pictures  light yellow colored ghee and golden colored ghee.


Ours is a ghee business in India.  I can say it's a family business. Wholesale and retail suppliers of ghee to any part in India.  Initially my hub's grandfather started a very small home based ghee business.  They used to go to individual house to collect the butter people make in their homes.  Later on, my Father-in-Law improved this business in a commercial way.  Then my Brother-in-Law (hub's elder brother) too joined him.  They buy cream in bulk from various dairies, prepare ghee and supply to the sellers.  Also local milk-men bring their milk daily, get the cream separated and take away the milk.

What I used:

Just the Unsalted Butter : 16 oz (450 gms)

How I did:
  • There are chances that butter may overflow when you boil it.  To avoid that, you need a very deep and wide vessel, preferably non-stick saucepan with high sides, to make ghee.   Make sure that the vessel can fit atleast almost double the quantity of butter you are using.
  • It can be boiled on any level of flame from high to low.  Whatever flame you use, it has be the same during the entire process of boiling the butter.  Do not the increase or decrease the flame at any point of boiling.  I prefer boiling it on a medium low flame. When it is boiled on high flame, there are chances of overflowing and get burnt easily and when it is boiled on very low flame it take a long time.  And hence the medium flame.  Make sure that your presence is absolutely necessary during boiling the butter to obtain the desired color and texture.  So try to avoid distractions.
  • Melt butter in the saucepan on medium low flame uncovered.  It takes almost two to three minutes for the butter to melt and start boiling. Small white curd like things start separating from the butter. 
  • Then gradually it starts spluttering and crackling.  When this is subsided, ghee starts foaming.  In the northern parts of India, ghee is now taken off the heat.  To obtain a darker color and reduce the moisture content, continue boiling. Keep stirring in between with a wooden spatula until the foam reduces to minimum.

  • Once you see a change in the color of the foam, try to see the bottom by siding the foam with the spatula.  You can observe the milk solids turn to golden brown at the bottom.  Now the ghee is ready. At this point you have to be very attentive, as it may get burnt easily.
  • Take the saucepan off the stove and transfer to another vessel to let cool for a while.  Transfer it to air tight container by filtering it through a very fine sieve or alternatively any sieve lined with two layers of cheesecloth.  Once filtered, leave it untouched until it is completely cooled.  This is required if you want the texture of your ghee to be grainy.
Note:  Once the ghee is completely cooled and solidified, it would be in semi-solid state.  Most of the people remelt ghee as it makes the serving easier.  One important thing to remember is never remelt the ghee else it will loose its texture and hardens when cooled.  


    Saturday, September 18, 2010

    Vegetable Rotini Pasta Stir-fry


    What I used:

    Rotini Pasta : 3 cups
    Onions : 1/2 (sliced thinly lengthwise)
    Carrot : 1 (sliced thinly)
    Celery Stalk : 1 (sliced thinly)
    Baby Corn Cobs : 10 to 15
    Green Bell Pepper : 1/2 (seeded and sliced thinly)
    Red Bell Pepper : 1/2 (seeded and sliced thinly)
    Garlic Cloves : 3 (sliced thinly)
    Ginger : 1" piece (chopped)
    Cornstarch : 1 tsp
    Honey : 1 tsp
    Salt : as required
    Pepper Powder : 1 tsp or as needed
    Maggie Seasoning : 1 tsp or as needed
    Olive oil : 1 tbsp

    How I did:
    • In a large vessel, bring water to boil adding a tsp of salt.  Add pasta and cook for about 8 to 10 minutes or until done.  Drain in a strainer and keep it covered until required.
    • In another vessel, boil water and add carrot slices and baby corn cobs.  Cook for 2 to 3 minutes and drain.  Run some cold water over them and drain.
    • Take a wok or kadai, heat a tbsp of oil, add ginger pieces.  Saute for a while and remove the ginger with a slotted spoon.  We just want the oil to be flavored.
    • Add garlic, onion, bell peppers and celery to the kadai and cook for 2 minutes stirring in between.
    • Add the cooked carrots and baby corn cobs and cook for another 2 minutes.
    • Add the pasta and stir. 
    • Mix corn starch in very little to make a smooth paste.  Pour this onto the pasta and stir.
    • Add honey, maggi seasoning and ground pepper and stir.  Cook for 2 more minutes stirring in between.
    • Serve immediately.

    Friday, September 17, 2010

    Anabakaya Palu Posi Koora (Bottle-guard with milk)


    What I used:

    Bottle guard : 1
    Milk : 1/2 cup (Preferably whole milk)
    Chopped Onion : 1/2 cup
    Chana dal : 2 tbsp
    Green chillies : 6 to 7 (slit lengthwise)
    Mustard seeds : 1/2 tsp
    Cumin seeds : 1/2 tsp
    Urad dal : 1/2 tsp
    Salt : as required
    Curry leaves : a few
    Red chillies : 1 or 2 (broken into pieces)
    Oil : 2 tsp

    How I did:

    • Wash, peel and cut bottle guard into small cubes.  
    • Heat 2 tsp of oil in a skillet, add mustard seeds, cumin seeds, urad dal, chana dal and red chillies.
    • When the seeds start crackling, add curry leaves and green chillies.  
    • Saute for a while and add onion cubes and salt.
    • Cook uncovered till the onions are half done and add bottle guard cubes.
    • Cover and cook for several minutes till the bottle guard is completely cooked.
    • Switch off the stove and pour in the milk.  Keep it untouched and uncovered on the same stove for about 15 minutes.  But do remember the stove should be switched off.
    • Serve with plain rice.

    Thursday, September 9, 2010

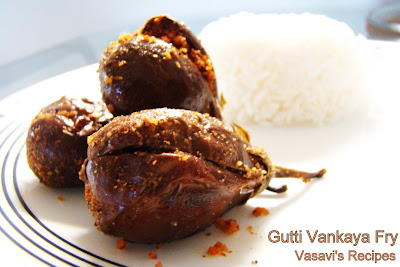
    Gutti Kakarakaya and Gutti Vankaya Fry

    The reason I'm posting both the recipes in the same post is because I used the same filling for both. This basic filling can also be prepared before hand and stored in the pantry for future use. Very handy when those last minute guests arrive. You could also just toss any veggies and sprinkle this powder for a quick side dish.

    What I used:

    For the Filling

    Senagapappu (Chana dal) : 1 cup
    Nuvvu pappu : 1/4 cup
    Minappappu (Urad dal) : 2 tbsp
    Jeela karra (Cumin seeds) : 2 tbsp
    Dhaniyalu (Coriander seeds) : 2 tbsp
    Mentulu (Fenugreek seeds) : 1 tsp
    Red Chillies : 7 to 8 (according to your spice level)
    Salt : as required

    How I did:
    • Except salt, roast all the ingredients separately on medium flame just until their color darkens a little.  When cooled combine everything, add salt and grind into a coarse powder.  Don't make it too fine.
    Gutti Kakarakaya


    What I used:

    Kakarakayalu (Bitter guard) : 8
    Basic Filling : 4 to 5 tbsp
    Tamarind : a lemon sized
    Chopped Onions : 1/2
    Salt : as required
    Oil : 3 tbsp

    How I did:
    • Soak a lemon sized ball of tamarind and extract the juice.  
    • Wash and cut off the ends of the kakarakayalu and slit them in center lengthwise.
    • Bring 3 cups (or enough water to boil kakarakayalu) of water to boil.  Add tamaring juice, a tsp of salt and the slit kakarakayalu to the boiling water.
    • Partially cover the vessel with a lid and cook till they are done.  Do not overcook but they should be soft when touched.  Switch off the stove and remove them from water and let cool.
    • In a bowl take chopped onions and mix in the basic filling powder and salt.
    • Stuff this mixture into the kakarakayalu.
    • Heat 2 tbsp of oil in a kadai and carefully add kakarakayalu to it.
    • Fry them on low flame making sure turning them around every 3 to 4 minutes.  Add a little oil in between if necessary and fry till they turn almost dark.
    • Just before switching off the stove sprinkle a tbsp of the basic filling powder on the top.
    • Serve with plain rice.
    Gutti Vankaya Fry


    What I used:

    Medium sized firm Vankayalu (Brinjals) : 10
    Basic filling powder : 4 to 5 tbsp
    Finely chopped garlic : 1 tbsp
    Finely chopped ginger : 1 tbsp
    Chopped coriander : 2 tbsp
    Chopped onions : 1/2
    Salt : as required
    Oil : 3 tbsp

    How I did:
    • Slit the brinjals into four sections from the end opposite to the stem, leaving the stem on. If the stems are too long cut off a little portion of them.  Take water in a vessel and add 1/4 tsp of salt.  Put brinjals in the water till they are transferred to the stove to retain the color.  Otherwise the brinjals may turn black.
    • In a bowl mix rest of the ingredients except oil and stuff this mixture into the brinjals.
    • Heat 2 tbsp of oil in a pan and add these brinjals carefully.
    • Fry them covered on low flame making sure turning them around every 3 to 4 minutes.  Add a little oil in between if necessary and fry till they are nicely roasted all around.  Test the brinjals if they are cooked completely by pinching one with your fingers. 
    • Just before switching off the stove sprinkle a tbsp of the basic filling powder on the top.
    • Serve with plain rice.

    Wednesday, September 8, 2010

    Eggless Chocolate Muffins


    What I used:

    All purpose flour : 1 1/3 cup
    Sugar : 3/4 cup
    Baking cocoa : 1/4 cup
    Baking soda : 3/4 tsp
    Salt : 1/4 tsp
    Cornstarch : 1/3 cup
    Sour cream : 1/2 cup
    Water : 1/2 cup and 2 tbsp (total 10 tbsp)
    Milk : 1/4 cup
    Vegetable oil : 1/4 cup
    Vanilla extract : 1/2 tsp
    Miniature semisweet chocolate chips : 1/4 cup

    How I did:
    • Preheat oven to 325 deg F and grease muffin pans or line them with cupcake liners.
    • In a large bowl combine all the dry ingredients except chocolate chips (All purpose flour, cocoa powder, baking soda, sugar, cornstarch and salt) and keep aside.
    • In a mixing bowl mix sour cream, water, milk, vegetable oil and vanilla extract and beat until combined well.  You could do this in a blender or use a hand mixer.
    • Pour this wet mixture into the flour mixture and mix just till all the ingredients are mixed well.  Incorporate chocolate chips and combine.
    • Pour the batter into the prepared muffin pans until 3/4 level and bake for about 20 to 25 minutes or until toothpick inserted comes out clean.
    • Best when served warm.

    LinkWithin

    Related Posts with Thumbnails

    Ads